Getting started with MLFlow with MinIO [In 2022]
Published:
![]()
For my (academic) research work, I was keeping it simple i.e. maintaining a CSV which was appended by a Python function for each machine learning (ML) experiment. So far, it was working quite nicely (for only single user, which is me). But, obvious downside was that I start having nested folders for the artifacts such as models, graphs, latent features etc. Also, opening the big csv file looks daunting. Therefore, I decide to try out MLFlow for my future experimentation. MLFlow, which is opensourced under Apache License 2.0 is a ML lifecycle platform which unify various aspect of ML which can include experimentation i.e. trying out different architectures, model parameters, data preprocessing etc. Additionally, it also act as central model registry which further support in reproducibility, deployment. For the trials, obvious choice is to use docker as usual. There are many great repositories exist (like this and this one). For my use-case, I’d like to use:
- MLFlow’s friendly UI for visualization and monitoring
- MinIO bucket to dump the model which can be easily switch with AWS’s S3 if I got the money
- Still usage SQLite for various parameters etc. because of my personal single-user requirements
Therefore, I created yet another GitHub repository which includes MLFlow and MinIO along with the SQLite.
Steps to running the setup locally or on remote server
One can setup the MLFlow server on a single machine using this approach. It can either a local machine from which you will run ML experiments or a remote machine which is simply used for tracking. In my case, it is a local machine.
- Clone the repository
git clone https://github.com/ikespand/docker-mlflow-minio.git. - This is optional step: you have then option to modify the user id and password for MinIO. For the same, edit the
.envfile to override default settings. Here don’t be confuse with AWS in name until unless you set it up. This naming comes from MinIO which offers S3-like storage facility locally. If you have AWS S3 account then you can configure it in similar way. - Start the docker for MinIO and MLFlow with SQLite by
docker-compose up. Use Powershell on Windows as volume mounting can have problems withgit-bash. - As a result, you should able to see localhost:5000 for our MLFlow server while localhost:9001 for MinIO.
- You can login to MinIO with the credentials mentioned in
.envfile. Yourusername=AWS_ACCESS_KEY_IDandpassword=AWS_SECRET_ACCESS_KEY. In MinIO dashboard, you will see themlflowbucket has been created as a result of our docker-compose run. - At this point, you can observe that
mlflow_dataandminio_datafolders are created in the repository. You can also configure the location of these folders by modifyingdocker-compose.yml. Here, your overall setup will look like as following: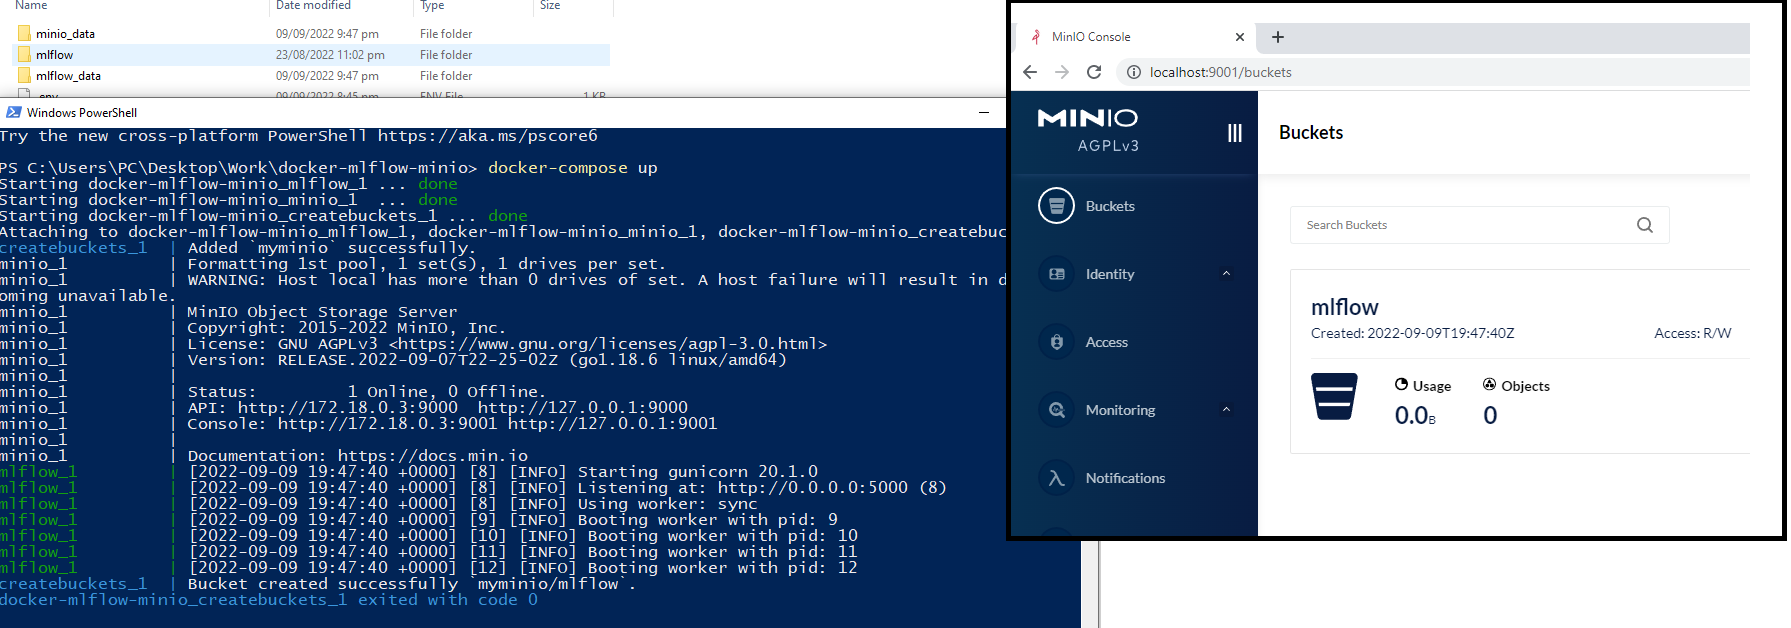
How it works?
- In
docker-composeservices, we first build the image for MLFlow which is pretty simple. We use the official python image and install few dependencies. I explicitly froze the version of pip packages because I had problem with the newer version of the libraries. We then use this build image and define all the key environment variables which MLFlow expects. The source of these still remains.envfile. - Then, we move to the MinIO image where again official image was used and we have defined all the environment variable in a similar way as of above.
- Finally, we have last step of
createbucketswhich will create the our first bucket formlflow. This step is using officialminio/mcimage which allow us to perform basic operations for buckets like copy, list etc.
Test
Once things are running and you’re able to see the dashboards for both MinIO and MlFlow then you can proceed to test this. First step is to configure the local machine where we will run the ML experiments. Therefore, configure the environment variable so that MLFlow’s python library can pick up these to communicate with MLFlow. Open the
bash_profileas shown below in Windows and copy-paste the credential from the.envfile there.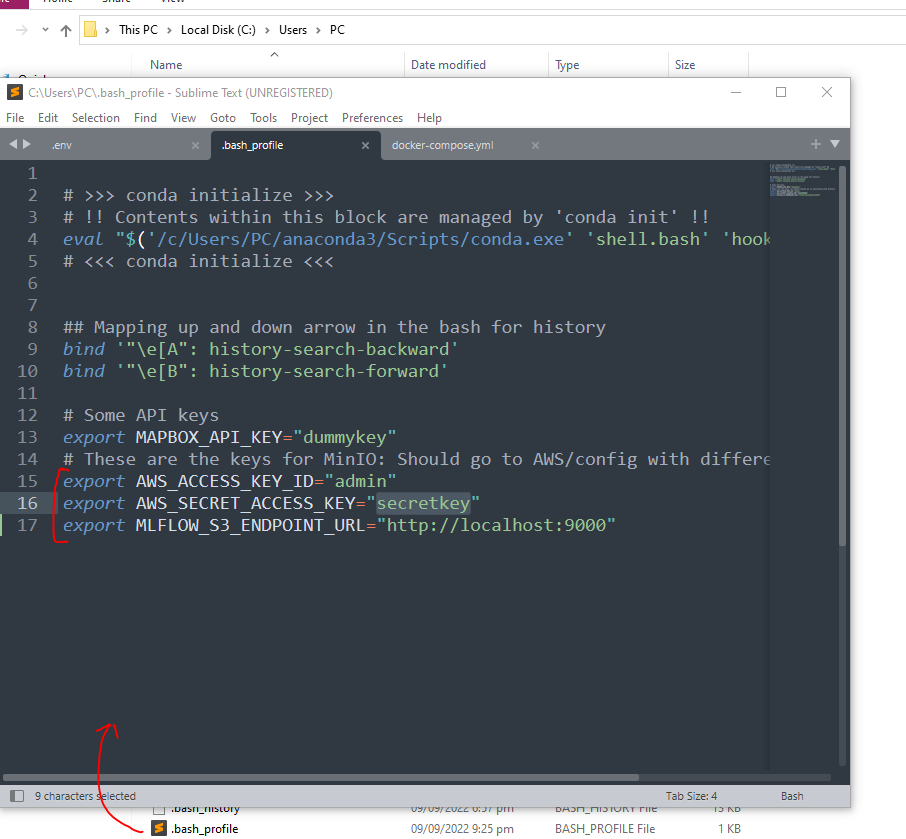
- Now, open the terminal and then start with experimentation. It is necessary to restart the terminal so that these evironment variable recognized by the session.
- Now, we’re all set to try it out. There is a script in the repository called
test_setup_with_scikitlearn.py. This script basically runs a Scikit-learn based machine learning task to classify MNIST dataset. You will observe that we have configured the MLflow with following lines.URI = r"http://localhost:5000" mlflow.set_tracking_uri(URI) mlflow.set_experiment("MyMLTask") - In the above, we have used
URIofhttp://localhost:5000becuase our MLFlow server is running on the same machine where we want to try out the ML run. In case, you have used a remote server exclusive for MLFlow then you need to replace theURIwith correponding machine’s IP address, also you might need to allow communication to 5000 port. - Logging a parameter, metric or a figure is pretty easy. The parameters and metrics goes to the SQLite while images goes to MinIO bucket. E.g.
# Log parameters with which we want to experiment and record results mlflow.log_param("gamma", gamma) mlflow.log_param("kernel", kernel) mlflow.log_metric("mse", mse) mlflow.log_metric("mae", mae) # Log figure to visualize after the runs mlflow.log_figure(fig, 'comparision.png') - Finally, we can save the final deployable model as an atifact which will also go to MinIo bucket. E.g.
# Save the model tracking_url_type_store = urlparse(mlflow.get_tracking_uri()).scheme model_signature = mlflow.models.signature.infer_signature(X_train, y_train) run_id = run.info.run_uuid experiment_id = run.info.experiment_id if tracking_url_type_store != "file": mlflow.sklearn.log_model(clf, "clf") else: mlflow.sklearn.log_model(clf, "clf", signature=model_signature) - After running the script, you can see this new experiment in the dashborad and browse through parameters and artifacts like following:

Next steps?
- Setting up complete pipeline for parameter tuning and logging.
- Model deployment directly from MLFlow.
- Use-case grows, then maybe try out more production ready setup like this.
Reach out to me on Instagram for a faster reply! 